We always want to approach our sales prospects with the utmost professionalism whether we’re working independently or as part of a larger organization. That can be pretty challenging when the best option to present ourself is a cold email. They don’t know who we are or our reputation. If a client can’t gauge that quickly they will not burn their valuable time to consider our proposition. However, there are many things we can do to improve our chances with new clients over cold emails. In this post we’ll highlight how to create custom email signatures. This valuable addition to your business not only acts as a business card, but as a way to humanize ourselves with a profile picture and engender trust with the complete strangers we hope to begin relationships with. Read on to find out how you can create your own, or read the section headers and skip to the end to find out how I can help your entire organization.
What you can do in email signature design, and more often, what you can’t
Email styling involves using older methods as many email clients don’t support modern CSS. Effects like box-shadows may show up in one service but not in another. For that reason it’s important to use campaign monitor’s guide to see what is supported in popular browsers today. Div elements cannot be used nor can position styling. Negative margin values are also unsupported. All positioning will instead rely on old-school HTML table layouts. Also, while the rest of this article will use pixels as an easy reference, you’ll want to convert any fixed measurements to use em instead of px, so that the styling is more consistent across mobile and desktop viewports. I recommend adding font-size: 16px to an inline style of your wrapper table element, so that we define a consistent default across all email clients. Convert your fixed pixel sizes by dividing them by 16 to get the measurement in em. Use replace-all (ctrl+H) in your code editor to save time. Be careful as nested elements may use its parent element to set the size rather than the default font-size you defined.
Step 1: Create a Design That Best Represents Your Brand
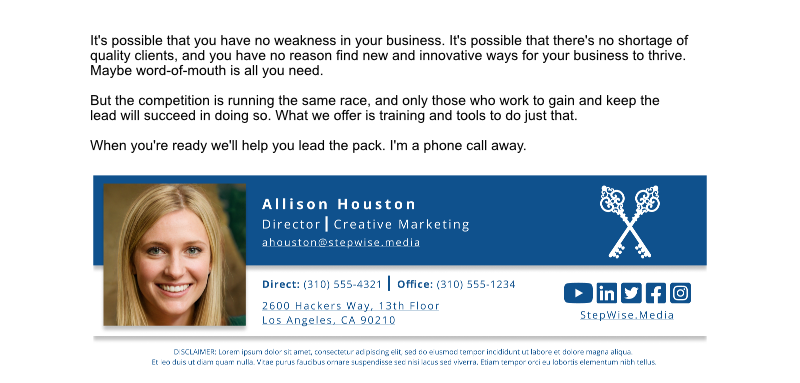
We’ll want to consider a few things before we begin our design. We’ll want to decide what social media links we want to include on our template besides our basic contact information like name, title, phone number, and email address. We’ll also want to consider what colors we want to use in our design. In general I recommend using one color from your company logo and a white background so that the signature ‘pops’ in your client’s email application.
Once all of the information is gathered we can begin designing. I use Figma with design clients so that they can see the updates made in real-time online using a link I send to them. Users added to the project can also write comments and keep them organized without relying on an exhaustive email thread or in-person meeting. Ideally we want our template to be no wider than 600 pixels and kept under a height of 200 pixels. Create a few sample designs and get feedback on what suits your organization best while ensuring those designs conform with your brand and style guide (if available).
Step 2: Upload Your Photos to a Public Folder
Once we have our final design selected, it’s time to create a public file repository where we can upload any photos to be included in our email template. I like to use dropbox and if you keep all files under 2GB it’s free. Otherwise you can use any service, so long as you can access a link to the photo without being an authenticated user of whatever service you choose. You can confirm that the links work by opening a private browsing tab in Brave or using Incognito Mode in Chrome Browser. If the link is inaccessible, make sure that the link has permissions set where anyone with the link can view the file. Another possible issue is that the link you’re given by the service provider isn’t set to allow downloads. Check out our example link:
https://www.dropbox.com/s/cazd4xjl6h6om69/keys.png?dl=0
If you copy this link and paste it in the browswer you’ll see blurry set of keys, but this photo wouldn’t be viewable in your email template because the ? query parameter is set as dl=0. There’s two things causing this issue. First, zero represents a falsey boolean value in programming, while the number one represents a truthy boolean value. The second issue is that this query parameter doesn’t allow hotlinking. So we update the link to say raw=1 instead, and your file will now be viewable within your email template.
Step 3: Create the Template Using HTML Tables and Inline CSS
We’re know all set to begin building our functional email signature template. Use an HTML table generator as a visual aide. This will help us observe where our elements might be placed in relation to our design and can also tell us if they need to be placed in table cells that span more than one column or row. For instance, in our example the profile photo spans two rows so that directly to the right of it we have the top row represent our name and title, while the row below that contains our contact information. This keeps us from crowding elements in one particular table cell.
Step 4: Add the Signature in Your Email Service Provider
Now that you have your template it’s time to add it to our email client. If your client allows for direct input of HTML use that. Otherwise open your template .html file in a browser window and press CTRL + A to select everything on the page before copying, and then paste it into your email signature field. Click save and test your email out to ensure that you’re all good to go. Google and Outlook have specific directions available for their email services.
What if I have multiple signatures I need made?
It’s possible to use a spreadsheet of employee information and a custom script to input each employees information into its own rendered template. It can be a pretty daunting task, if you’re not familiar at all with writing code. If that’s the case, please reach out to me for help.
I offer a complete package covering design, revisions, development, and scripting for a flat rate of $1000 USD for the first 50 employees. Additional employees are $20 for each thereafter, with options to add a form generating new & consistent signatures for every employee you hire moving into the future. Lock in early pricing now while this service platform is under initial development, and get your fully customized template created.
Don’t let poor presentation be the reason you missed out on a sale. Schedule your free consultation today!